

How To Increase Ui Font Size On Sql Developer Windows 10
This browser is no longer supported.
Upgrade to Microsoft Edge to take advantage of the latest features, security updates, and technical support.
How to: Change fonts, colors, and themes in Visual Studio
You tin change the fonts and the colors in Visual Studio in several ways. For instance, you can modify the default dark theme (likewise referred to as "night mode") to a light theme, a blueish theme, an extra-contrast theme, or a theme that matches your system settings. You lot can too change the default font and text size in both the IDE and the lawmaking editor.
You can change the fonts and the colors in Visual Studio in many ways. For example, y'all can alter the default bluish color theme to the night theme (too referred to as "dark style"). You can besides select an extra-contrast theme if that best suits your needs. And, you can alter the default font and text size in both the IDE and the code editor.
Modify the colour theme
Hither'southward how to change the color theme of the IDE frame and the tool windows in Visual Studio.
-
On the carte du jour bar, choose Tools > Options.
-
In the options list, choose Environs > General.
-
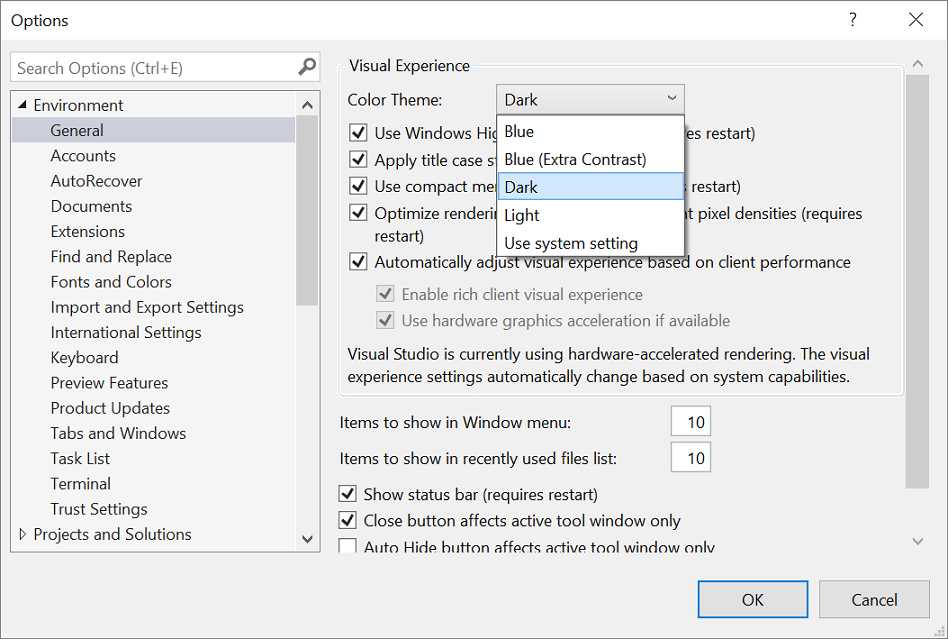
In the Color theme list, cull either the default Dark theme, the Lite theme, the Blue theme, or the Blue (Extra Dissimilarity) theme.
You lot can too choose to use the theme that Windows uses by selecting Use system setting.
Note
When y'all modify a color theme, text in the IDE reverts to the default or previously customized fonts and sizes for that theme.
-
On the card bar, choose Tools > Options.
-
In the options list, cull Environment > Full general.
-
In the Colour theme list, cull either the default Blue theme, the Light theme, the Dark theme, or the Blue (Extra Contrast) theme.

Note
When you change a colour theme, text in the IDE reverts to the default or previously customized fonts and sizes for that theme.
Modify fonts and text size
Y'all tin can modify the font and text size for all the IDE frame and tool windows, or for only certain windows or text elements. You can also alter the font and text size in the editor, too.
To change the font and text size in the IDE
-
On the menu bar, cull Tools > Options.
-
In the options list, choose Surroundings > Fonts and Colors.
-
In the Show settings for list, cull Environment.

Notation
If you lot want to change the font for tool windows only, in the Show settings for list, cull All Text Tool Windows.
-
Change the Font and Size options to modify the font and text size for the IDE.
-
Select the appropriate detail in Display items, and and so modify the Item foreground and Item background options.
-
On the menu bar, choose Tools > Options.
-
In the options list, cull Environment > Fonts and Colors.
-
In the Evidence settings for list, choose Environment.

Note
If you desire to change the font for tool windows only, in the Show settings for list, choose All Text Tool Windows.
-
Alter the Font and Size options to change the font and text size for the IDE.
-
Select the appropriate item in Brandish items, and then modify the Item foreground and Detail background options.
To change the font and text size in the editor
-
On the menu bar, choose Tools > Options.
-
In the options list, choose Environment > Fonts and Colors.
-
In Show settings for list, select Text Editor.

-
Change the Font and Size options to change the font and text size for the editor.
-
Select the appropriate item in Display items, so modify the Item foreground and Detail background options.
-
On the carte bar, cull Tools > Options.
-
In the options list, choose Environs > Fonts and Colors.
-
In Show settings for list, select Text Editor.

-
Modify the Font and Size options to change the font and text size for the editor.
-
Select the appropriate particular in Display items, and and so modify the Particular foreground and Item background options.
For more information well-nigh how to change fonts and colors for accessibility, see the Set up accessibility options section of this page. And, for details near all the user interface (UI) elements where yous can modify font and colour schemes, come across the Fonts and Colors, Surroundings, Options Dialog Box page.
Set language-specific editor options
Yous can brand a variety of changes to the lawmaking editor to adapt your programming linguistic communication of choice. For example, you tin change brace formatting in C# to announced inline or on a new line, and more. To learn how to customize the code editor, see Fix linguistic communication-specific editor options.
Set up accessibility options
In a neurodiverse globe, we desire to support our different learners and low-vision users by offering the following font options and color themes:
- You can apply the Cascadia Lawmaking font, which adds more weight to the proportions of letters, numerals, and characters to help disambiguate them. Cascadia Code also includes coding ligatures.
- Yous can choose to use a loftier-contrast color theme for all the apps and UI on a figurer, or an extra-dissimilarity color theme for Visual Studio just.
Apply the Cascadia Code font
The new Cascadia Code font includes Cascade Mono, which is the default font in Visual Studio 2022. Non only are both of these fonts easier to read, but the Cascadia Code font too includes coding ligatures that turn a sequence of characters into a glyph. Coding ligatures, or glyphs, make it easier for people to cognitively acquaintance the pregnant behind them.
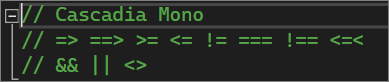
The following screenshot shows an case of the default Cascadia Mono font and lists a series of characters, to include mathematical symbols, that yous might notice yourself using while yous code.
The post-obit screenshot shows an case of the Cascadia Lawmaking font, where the same series of characters shown previously are now converted to coding ligatures, or glyphs.
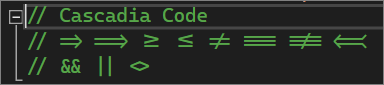
Notice that the last line of text in the Cascadia Lawmaking screenshot shows how the space between duplicate characters is reduced, which also makes them easier to read.
Here's how to toggle betwixt the Cascadia fonts:
-
Go to Tools > Options > Environment > Fonts and colors.
-
From the Font dropdown list, select either the Cascadia Code font or the Cascadia Mono font yous want, and so select OK.

In that location are color theme options for you if yous experience depression vision. Y'all tin use a high-contrast option for all the apps and UI on a calculator, or an actress contrast option for Visual Studio just.
Employ Windows high contrast
Utilize either of the following procedures to toggle the Windows high contrast pick:
-
In Windows or in whatsoever Microsoft awarding, press the Left Alt+Left Shift+PrtScn keys.
-
In Windows, cull Start > Settings > Ease of Admission. Then, under the Vision section in Windows 10 and later, choose High contrast.
Warning
The Windows loftier contrast setting affects all applications and UI on the computer.
Use Visual Studio extra dissimilarity
Use the following procedures to toggle the Visual Studio actress contrast pick:
-
On the card bar in Visual Studio, cull Tools > Options, and and then, in the options listing, cull Environment > Full general.
-
In the Color theme drib-downward list, choose the Blue (Extra Contrast) theme, and then choose OK.
Tip
If there is an accessibility option for colors or fonts that you think might be useful but isn't currently available in Visual Studio, please permit usa know by selecting Suggest a feature in the Visual Studio Developer Community. For more information about this forum and how it works, see the Suggest a characteristic page.
More accessibility features in Visual Studio
Visual Studio as well includes features to help people who have limited dexterity to write. For example, Visual Studio supports Dvorak keyboard layouts, which make the virtually frequently typed characters more accessible.
Y'all can also customize the default keyboard shortcuts bachelor with Visual Studio. For more information, see the following pages:
- Identify and customize keyboard shortcuts
- How to use the keyboard exclusively
- Keyboard shortcuts in Visual Studio
Visual Studio likewise includes auto-completion for methods and parameters; for more than information, see IntelliSense in Visual Studio.
There are more than ways to customize Visual Studio to be more accessible to you. For instance, you can change the behavior of popular-up windows, text-based tool windows, toolbar buttons, margin indicators, and more.
Note
The dialog boxes and card commands yous see might differ from those described here, which tin vary depending on your active settings or edition. To change your settings, choose Import and Export Settings on the Tools card. For more information, see Reset settings.
Change the beliefs of pop-upward windows
Visual Studio displays popular-upwardly windows in the editor. These pop-upwardly windows include information that makes coding easier, such as parameters to complete a role or statement. The pop-up windows can also be helpful if y'all have difficulty typing. However, some users might find that they interfere with focus in the code editor, which can be problematic.
Hither's how to turn off the pop-upwardly windows:
-
From the Tools menu, choose Options.
-
Choose Text Editor > All Languages > General.
-
Clear the Auto list members and Parameter data checkboxes.
You can rearrange the windows in the integrated evolution environment (IDE) to best suit the way you work. You can dock, float, hibernate, or automatically hide each tool window. For more than information well-nigh how to modify window layouts, see Customize window layouts.
Change the settings of text-based tool windows
You can change the settings for text-based tool windows, such as the Command window, Immediate window, and Output window by using Tools > Options > Environment > Fonts and Colors.
When y'all select [All Text Tool Windows] in the Testify settings for drop-downwards list, the default setting is listed as Default in the Detail foreground and Item background drib-downward lists. Choose the Custom push button to change these settings.
You lot tin can as well change the settings for how text is displayed in the editor. Here's how.
-
From the Tools menu, choose Options.
-
Choose Surround > Fonts and Colors.
-
Select an selection on the Evidence settings for drop-downwards carte.
To change the font size for text in an editor, choose Text Editor.
To alter the font size for text in text-based tool windows, choose [All Text Tool Windows].
To change the font size for ToolTip text in an editor, choose Editor Tooltip.
To change the font size for text in statement completion pop-ups, choose Statement Completion.
-
From Display items, select Apparently Text.
-
In Font, select a new font type.
-
In Size, select a new font size.
Tip
To reset the text size for text-based tool windows and editors, choose Use Defaults.
-
Choose OK.
Alter the colors for text, margin indicators, white space, and code elements
You can choose to change the default colors for text, margin indicators, white infinite, and code elements in the editor. Here'due south how.
-
From the Tools menu, cull Options.
-
In the Surround binder, cull Fonts and Colors.
-
In Evidence settings for, cull Text Editor.
-
From Display items, select an particular whose display you need to change, such every bit Patently Text, Indicator Margin, Visible White Space, HTML Attribute Proper name, or XML Attribute.
-
Select display settings from the post-obit options: Particular foreground, Item groundwork, and Assuming.
-
Choose OK.
Tip
To use loftier contrast colors for all application windows on your operating organization, printing Left Alt+Left Shift+PrtScn. If Visual Studio is open, close and and so reopen information technology to fully implement loftier contrast colors.
Add text to toolbar buttons or modify the text
To improve toolbar usability and accessibility, you lot can add text to toolbar buttons.
To assign text to toolbar buttons
-
From the Tools carte, cull Customize.
-
In the Customize dialog box, select the Commands tab.
-
Select Toolbar, and and then choose the toolbar name that contains the push you intend to brandish text for.
-
In the listing, select the command you intend to change.
-
Choose Modify Selection.
-
Choose Prototype and Text.
To modify the displayed text in a button
-
Re-select Modify Selection.
-
Side by side to In Name, insert provide a new caption for the selected button.
Accessibility back up
For more information about features, products, and services that make Windows more accessible for people with disabilities, see Accessibility products and services from Microsoft. And, for more than information about how to obtain more accessible formats of documentation for Microsoft products, run into the Documentation in culling formats section of the Accessibility products and services from Microsoft folio.
The accessibility information included on this page might employ just to users who license Microsoft products in the United States. If you lot obtained this product outside of the United states, visit the Microsoft Accessibility website for a list of Microsoft support services telephone numbers and addresses. You lot can contact your subsidiary to find out whether the type of products and services described on this page are available in your area. Information nearly accessibility is also bachelor in other languages.
Meet also
- Features of the Visual Studio code editor
- Personalize the Visual Studio IDE and the editor
Feedback
Submit and view feedback for

How To Increase Ui Font Size On Sql Developer Windows 10,
Source: https://docs.microsoft.com/en-us/visualstudio/ide/how-to-change-fonts-and-colors-in-visual-studio
Posted by: shawsmandertne.blogspot.com
0 Response to "How To Increase Ui Font Size On Sql Developer Windows 10"
Post a Comment